
Heroes or Villains? Super and Wonder revealed. (ML Super/Wonder hop bucking)
Back in March this year we got our first glimpse of the newly released "Hero" series hop-up buckings from Maple Leaf, the Super and Wonder, and we made some pretty bold predictions about how these new buckings would perform and fair against their previous flagship "Transformer" series buckings, the famous Autobot and Decepticon rubbers.
You can catch up on our preview article here: link

Well after we first received our test buckings from Skirmshop UK, we have had the Hero buckings installed now in our MK23's for long enough that we think we can give a bit more of a detailed response on whether our initial predictions still hold true, and whether it aligns with what other users are saying in the community right now. In short, things are very positive, but like a piece of IKEA furniture, you need to be prepared to read the manual before you end up with a sturdy and trust worthy end result.
So following on that note, rather than starting with the good bit's first, lets get in to the crux of the matter on why these new Heroes started to become known for their acts of villainy. The installation.
When we wrote our previous article on the Wonder and Super bucking, we spoke about all the positive and negative things that we spotted, using the images that were available to us at the time. However as our reference images were quite limited, we missed one critical piece of information that very quickly became evident once we and others in the community got their hands on the phyiscal item; the bucking did not have the exterior locating tab that we have all come to take for granted on a VSR / GBB bucking.

Whilst Maple Leaf's reasoning for this was justified (in that they wanted to accommodate KJW products), one could consider it a massive oversight to not consider the consequences this would have on their existing user base that used products that relied on that locating tab for correct barrel alignment and installation, such as the MK23. Without the locating tab present, inexperienced users looking to upgrade to the new Super or Wonder bucking were left open to user error and poor installation issues; and like evil in the hearts of the weak, word and negativity for the bucking spread fast. And we'll admit, despite all the good that the buckings did, that same evil touched our minds too, for a moment.
It was only after seeing countless posts from users in the community struggling with the locating tabs, or at least telling others to avoid the issue entirely by staying away from the buckings did we decide to really take another look and see how we could over come the issue in a very simple manner - because we were experiencing the same, and it sucked.
The solution
With the Super bucking in hand, and under bright light, we inspected every millimeter of the buckings external surface, and we noticed that where the locating tab usually would have been was instead a feint but smoothed line, running the full length of the rubber. This rubber would not be easily seen unless looking for it, but it certainly is the key to installing the rubber correctly. You'll find it just left of the two grooves for the hop arm placement on the top of the rubber.


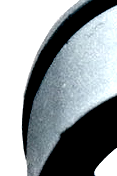
Our guess is that this line was just the leftover result of removing the locating tab from the previous bucking design, so with the line located, the next step was to confirm that this was the case.
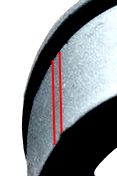
Using a permanent marker, a line was drawn over our locating tab line so that we could visibly verify its location once added to a barrel and placed within the hop unit assembly. The Teflon tape was added afterwards and not relevant to the installation, metal C clip was not added at this point.


With the line added, we placed it in the hop assembly and rotated the rubber until the line appeared exactly in gap in the hop up assembly used to lock in the locating tab, and to our surprise, it was a perfect center alignment when looking down the barrel with the line in position. With the thickness of the pen we used, we found that the bottom of the black line had to line up exactly with the bottom of the locating gap in the hop assembly for perfect center fitment.


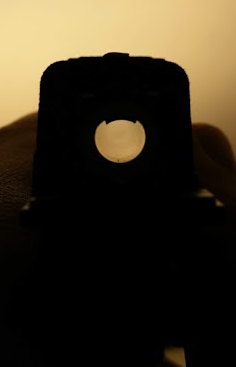
Sticking the two halves of the hop up assembly together, and pressing down on the hop arm (with the Hadron Airsoft Designs FANG plate installed), we could immediately see that things were looking good after aligning our "new" locating tab. Here's a view down the barrel.

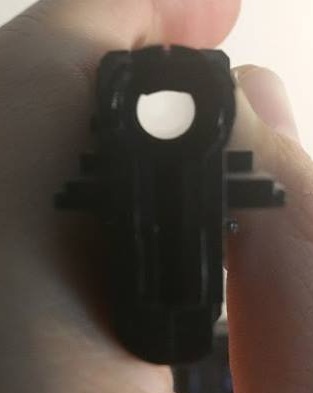
Continuing with the installation, we secured the two halves by adding the screws back in and put on our trusty Hadron Airsoft Designs TDC dust cover, we then verified our center alignment once again, by looking down the barrel. We then noticed the next issue people had experienced when using the Hero buckings, again due to the lack of locating tab. The barrel had rotated slightly whilst we had secured the two halves of the hop assembly. But quickly looking to the side of our hop unit, we could see that our locating tab line had moved off position. After popping off the TDC again, a gentle but firm turn of the barrel got our barrel correctly lined back up with the locating tab gap and our bucking was back on center and would not turn again unless firmly done so by hand. The TDC went back on, and we looked back down the barrel to verify out position - we were back in business.

We were now starting to see the Hero bucking again for it's true qualities, but there was still some villainy to iron out before the day was saved. The sticky trigger had shown it's face again.
The other other problem
The sticky trigger is something we have talked about before and it comes up almost every other day in the community, but luckily its something we are so familiar now with, that we can squash it every time it pops up. The issue in this case, was that after installing the Super or Wonder bucking, that the sticky trigger issue would be there, 90% of the time, waiting for you.
Unlike the regular cases of Sticky Trigger, there was not 1 single fix for the problem, and instead, depending on your specific MK23, one thing would work whilst another would not. In our case, myself and Gary both solved the Sticky Trigger differently. Gary went the more permanent way, by filing the top side of the nozzles BB loader, so that the loader would be lowered and would not catch the bottom of the bucking and get stuck on it's return travel back to a neutral position for the next shot. Whilst this solved his issues entirely, it required him to remove the nozzle from the nozzle housing, and permanently modify the nozzles BB loader; this is simply something that 90% of MK23 users would not attempt, for it's risk and difficulty alone. If you're feeling technically confident, this is the right way to do it - permanently.

The next option was to lubricate (such as silicone oil) the lower external surface of the Hero bucking and the hop up assembly track that the nozzle would ride through each time the pistol cycled. This would prevent the bucking from gripping the nozzles BB loader each time the trigger was pulled. Although this solution worked, it did eventually start to wear off as the lubricant dried and spread around the assembly. It's also just better that lubricant is generally kept away from the hop up unit all together. This method is the least technical and is also the easiest to give a quick try with the least risk.

I opted for the tried and tested "Heroshark" method (fitting that this method was the solution to the "Hero" bucking problem) , which we recently wrote about. This of course involved lowering the feed lip using Teflon tape to lower the height of the nozzle travel, and relieve the friction of the nozzle as it pulled away from the bucking exterior. This required minimal technical knowledge and is fairly low risk to perform, but did take some time to position correctly. You can read more about this method here: Link.

With the nozzle free to move, barrel and rubber perfectly center aligned, the day was won.
Yes, we agree that installing a hop rubber should not require so much effort to install, nor should the user be inconvenienced to the point where they need to do any modifications or "hacks" elsewhere in the pistol to get the rubber to work as it should. But the solutions presented really are easier than they look to carry out, and the gains from doing so are very very visible once done. Lets finally talk about those gains.
Hero qualities
It comes down to the main question, "Is it better than the Autobot or Decepticon?". The answer is a confident "YES" from us. We can point out a few things now that lend to this success which will start to sound familiar to the predictions we made in our review post.

1. The air seal.
The sealing on the Hero buckings is just better and more form fitting than the Transformer series buckings, even when using a competitor brand barrel. Here we can see how it fits on a Modify SS Barrel (knowing that the Maple Leaf buckings should be paired with a Maple Leaf barrel for best performance).


The sealing is further improved on the front of the bucking, as inner ring closes around the nozzle as it pushes the BB in, next to this inner ring is the usual recess in the rubber present on Maple Leaf rubbers in which the C clamp presses down in to. The two of these features create excellent air seal.
2. The window locating nubs.
The Hero buckings feature the addition of 2 window locating nubs, one each side of the hop mound. When the bucking is in place on a compatible barrel, the window locating nubs keep the mound centered in the window and prevent the rubber from twisting on the barrel. This is a great addition and really helps keep the mound centered for consistent performance. On the stock barrel, these nubs can squash out to the side as they do not have enough room to fit in to the window, which again reiterates the need for the user to combine the bucking with a Maple Leaf or barrel with similarly sized window. In the photo below, a Modify SS barrel is used again to show compatibility.


3. The mound re-design.
Both the Super and Wonder buckings took on a new hop mound design compared to their Transformer buddies, with their mounds being widened at the sides of the mound, and their concave depth increased. The result of this is a far greater surface coverage of the BB, which we know to be a direct improvement on hop up stability and flight. The additional benefit is that this only improves the synergy of the Hadron Airsoft Designs FANG plate. The mound re-design is arguably the biggest gain from the Hero series. Below is a cut-out of the Decepticon and the Super below it.


So those are the obvious facts, let's summarize with a before and after photo.
Take a look at these comparisons. On the left you have the Super, and the right, the Decepticon.


The images are pretty telling, but how does it perform?
For the moment, we can only give our opinionated feedback, as it's a difficult science to record subtle improvements whilst considering a lot of factors such as gas used, wind conditions and shooter error. But if you value our opinion on this, then that should give you an indicator on how the new Hero buckings perform. Gary got his hands dirtier much sooner than I did, and he briefly reported his findings in the MK23 Owners group some time ago, you can still find his write up here: Link.
As for me, I can confirm the following: 1. The TDC screw required less adjustment down on to the rubber before the BB (a 0.43g) gained a flat trajectory out to 70m. Which means that applying more hop adjustment to it sees the BB easily reach out to 80 and even 90m with slight over-hop before you reach typical adjustment levels where over-hop starts to decrease the range. This is an advantage and opens up the use of heavier BB's for less adjustment on the TDC.
2. Shot placement was far more consistent than my decepticon bucking, with shots returning to the same spot each time. Shot flight remained straight until termination. This is something I think is the result of the window locating nub and wider hop mound, which prevents unwanted movement at the time of the BB ejection from the rubber.
3. The Hero bucking synergizes with after market parts far better than the Transformer series. I believe the tolerances of the hero bucking are just far better and create much better fitment. The hop mound re-design melds far better with the FANG plate, or even H-Plate for that matter.
Whilst we generally like to test things for a little longer before we rush out to the streets to urge everyone to make the switch to a new product, we feel that already having 2 years with the Transformer series buckings, we have a decent idea of their performance and can see that the Hero buckings have clear improvements over them. Our feelings for now are that the Hero buckings are a strong upgrade, and if you don't yet own a Maple Leaf bucking and are looking to use the Maple Leaf family of products, then it's a good choice over the Transformer series and you should not hesitate.
This isn't the last we'll speak about the Hero buckings (as we have to get more scientific data), but for now, we hope it helps you make an informed choice about them and helps relieve any installation issues that you might have if you choose to use them (or currently have).
The Super and Wonder buckings are now widely available from many retailers, but you'll find them at the same place we initially got ours: Skirmshop UK.

Discount code: onmymk


